Learn
Backgammon setup: checker positions and direction
Set up all 30 checkers correctly, follow White and Black around the board, and catch common mistakes with an original numbered diagram.
Set up each player’s 15 checkers as 2 on the 24-point, 5 on the 13-point, 3 on the 8-point and 5 on the 6-point, counting from that player’s perspective. In the diagram below, White’s home is the lower-right quarter. White travels from 24 down to 1; Black travels the other way.
Put the checkers on the board
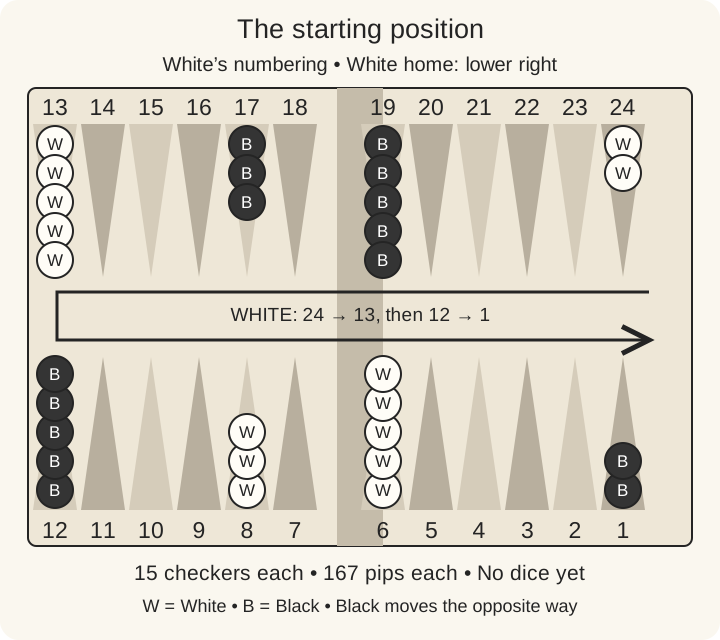
Every number in this diagram belongs to White’s numbering system. The letters W and B identify the checkers even without color.
| Stack | White’s point number | White checkers | Black’s location in the same diagram |
|---|---|---|---|
| Farthest from home | 24 | 2 | 2 on White’s 1 |
| Far-side outer board | 13 | 5 | 5 on White’s 12 |
| Near-side outer board | 8 | 3 | 3 on White’s 17 |
| Home-board edge | 6 | 5 | 5 on White’s 19 |
The opponent uses the same 2–5–3–5 arrangement from their own perspective. Your point and their point always add to 25: your 6 is their 19. The starting arrangement and the two possible mirrored board orientations are described in the USBGF setup rules.
Find home, the bar and the direction of travel
White’s home contains points 1–6 at the lower right. Point 6 is beside the bar; point 1 is at the outside edge. Across the board, Black’s home is the upper-right quarter: White’s points 19–24.
Follow a White checker from 24 across the top row toward 13, around the left end to 12, then across the bottom row toward 1. It never cuts vertically across the board from 24 to 1. Black follows the reverse route. The center strip is the bar, where hit checkers wait. It is not an extra point to count when moving.
For example, a White checker on 8 moves three spaces to 5: count 7, 6, 5. Crossing the bar between 7 and 6 does not cost another space. When Black moves a checker from White’s 17 with a 3, it reaches White’s 20. In Black’s own notation that is 8/5.
Check the board before the opening roll
- Count 15 checkers of each color: 2 + 5 + 3 + 5.
- Confirm that each player has a stack of five on their own 6-point and a stack of three on their own 8-point. They sit on opposite sides of the bar, with point 7 empty between them.
- Confirm that the two back checkers are in the opponent’s home board, as far from their own home as possible.
- Leave the bar and both bear-off trays empty.
- If using a doubling cube, center it between the players at a game value of 1. A physical cube with no 1 commonly shows 64 in this initial position; that does not make the opening game worth 64 points.
Each side starts with a pip count of 167: 2×24 + 5×13 + 3×8 + 5×6. That is a useful arithmetic check of the diagram, not a score or a prediction of who will win.
Common setup mistakes
- Putting five on 8 and three on 6. The home-board stack is five; the outer-board stack nearby is three.
- Using White’s numbers for both players’ instructions. Black’s 24 is White’s 1, not the same physical point as White’s 24.
- Sending both colors the same way. The players move in opposite directions.
- Mixing mirrored layouts. Home may be on the left on another board, but the entire setup and direction must mirror together. Follow one convention for the whole game.
With the board ready, play the opening roll and your first turn. For an offline table reference, keep the printable starter kit beside the board.