Printables
Free backgammon starter kit: setup, rules and scorecard
Print a four-page backgammon beginner kit in A4 or US Letter: numbered setup, essential rules, common mistakes and a scorecard. Read the full text online.
Download the starter kit
 Download the starter kit - A4PDF · A4 · 4 pages · v1.0.0
 Download the starter kit - US LetterPDF · US-Letter · 4 pages · v1.0.0
A companion for your first game
Keep the rules beside your board, spend less time looking things up, and enjoy playing together. This free, ungated English kit has four pages: a numbered setup card, essential rules, five common-mistake reminders and a reusable scorecard. The same instructions are available as text below.
Choose A4 for 210 × 297 mm paper or US Letter for 8.5 × 11 inch paper. Both downloads contain the same content, with layouts fitted to their paper size. Print in portrait at actual size / 100% on matching paper. No borderless setting is needed. Black-and-white printing works: checker letters and outlines carry the meaning. Print all four pages or select the pages you need; print extra copies of the scorecard for later games.
You may print and share unchanged copies of this original kit for personal use, teaching or club sessions, keeping the attribution. This permission covers our original text and diagrams, not material on the external reference websites. The kit teaches standard backgammon; regional variants can differ.
Page 1: set up the board
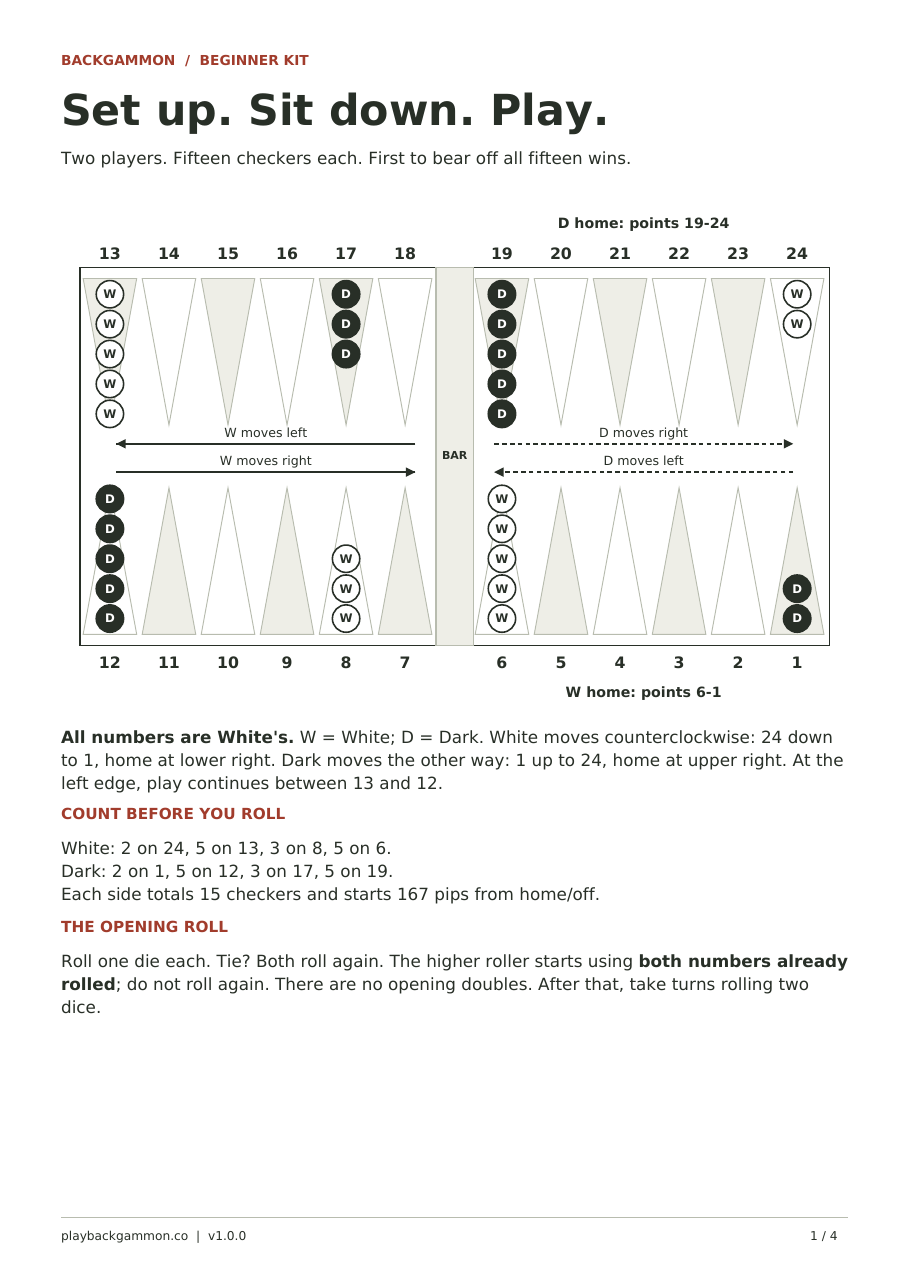
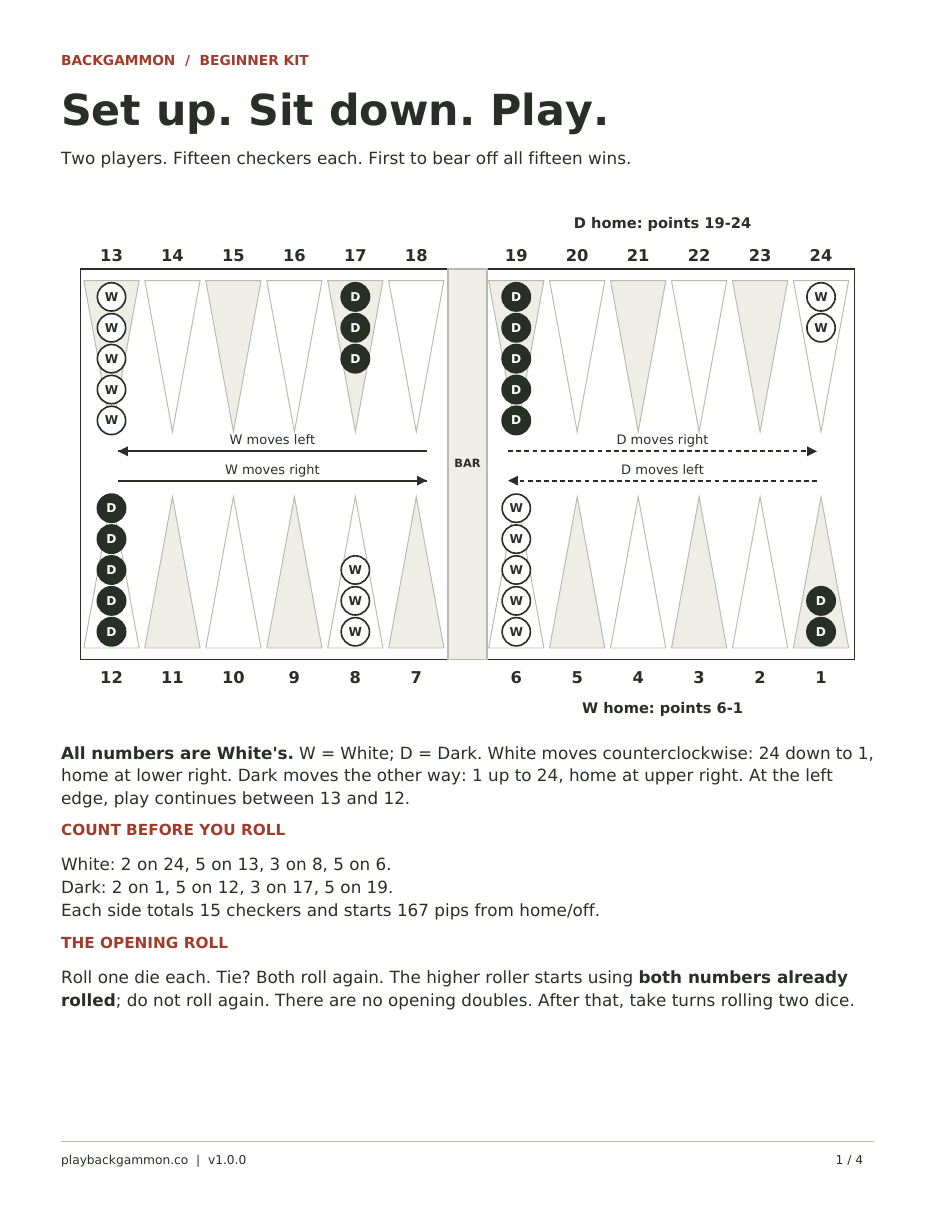
Use 15 checkers per player on a board with 24 triangular points. All numbers here are from White's perspective, with White's home board at the lower right. W means White and D means Dark; these letters appear on the printed checkers.
| Player | Starting point and checker count | Total |
|---|---|---|
| White | 24: two; 13: five; 8: three; 6: five | 15 |
| Dark, using White's point numbers | 1: two; 12: five; 17: three; 19: five | 15 |
Across the top row, points run from 13 at the left to 24 at the right. Across the bottom, they run from 12 at the left to 1 at the right. The central bar divides the board between 18 and 19 above, and 7 and 6 below. White's home contains points 6 through 1; Dark's home contains points 19 through 24.
White moves counterclockwise from 24 toward 1: left along the top, around the left edge from 13 to 12, then right along the bottom. Dark moves in the opposite direction, from 1 toward 24. Each player starts with a pip count of 167, the total point-distance their checkers must travel to be borne off. See the full setup lesson.
To start, roll one die each. On a tie, both players roll again. The higher roller uses both numbers already rolled for the opening turn, without rolling again. There are no opening doubles. Thereafter, alternate turns rolling two dice. Setup and opening rules are described by USBGF: Backgammon Basics and Backgammon Galore: Basic Rules.
Page 2: essential rules
Move one die at a time
Each die supplies a separate move forward. Move two different checkers or use both dice on one checker, in either order. Count the points travelled, excluding the starting point. When one checker uses both dice, its intermediate landing must be legal too. A point with two or more enemy checkers is blocked. Empty points and points occupied by your own checkers are open; a lone enemy checker can be hit.
Use every playable die
Use both dice when any legal sequence permits it. You cannot choose an order that wastes a die if a different order uses both. If only one number is playable, use it. If either number is playable but both cannot be used, play the higher. Doubles give four moves of the number shown; use as many as legally possible. Pass only when no move is legal. Backgammon Galore's moving-checkers questions explain these obligations. Walk through a complete turn.
Hit a blot; enter from the bar
A lone checker is a blot. Landing on an enemy blot sends it to the bar. With any checkers on the bar, you must re-enter them before moving other checkers. Enter into the opponent's home board on an open point matching a die's distance from the bar. In our White-based numbering, White enters on 25 minus the die: a 1 enters on 24 and a 6 on 19. Dark enters on the number rolled.
If you cannot enter all your bar checkers, enter as many as legally possible and stop. If you enter the last one, use any remaining dice legally, with the entered checker or another checker. The USBGF hitting and entering rules describe this priority.
Bring everyone home, then bear off
Bearing off means removing a checker from the board. All your checkers still in play must be in your home board first. Count home points from your own exit: an exact die can remove a checker from its matching point. If that point is empty, use the die for a legal move from a higher point when possible. An oversize die can remove a checker only from your highest occupied point. You may choose a legal move within home instead of bearing off, but must still satisfy mandatory dice use.
If a checker is hit during bearing off, you must re-enter it and bring it home before bearing off again. The first player to bear off all 15 wins. Read the bearing-off lesson for more examples; the underlying rules are in USBGF's bearing-off section.
Page 3: five mistakes to catch
The printed sketches are partial diagrams, using White's point numbers. A point described as blocked has at least two Dark checkers; unspecified points relevant to the described move are open.
- Using one die when both could work. Roll 6 and 1. White has one checker on 6 and one on 2, with 13 already off. Dark blocks 1. Taking the checker from 6 off first would leave no move for the 1. Instead, play 6 to 5 with the 1, then use the 6 to bear that checker off 5. Both dice are used; the checker on 2 stays there.
- Choosing the smaller die when only one can be used. Roll 2 and 4. White has one checker on the bar and 14 on 6. Dark blocks 2, 4 and 19; 21 and 23 are open. White could enter on 23 with the 2 or 21 with the 4, but the remaining die would then be blocked, both for the entered checker and for the checkers on 6. Only one die can be played, so White must enter on 21 using the higher die, 4.
- Jumping a blocked intermediate landing. Roll 3 and 2. A White checker is on 8; Dark blocks both 5 and 6. Even if 3 is open, that checker cannot move from 8 to 3: the 3-first route lands on blocked 5 and the 2-first route on blocked 6. Look for legal moves with other checkers.
- Moving another checker before entering. Roll 1 and 3 with one White checker on the bar. Dark blocks 24, while 22 and 21 are open. Enter on 22 using the 3 first. Then the 1 can move that checker to 21, or make another legal move. The entry obligation comes first.
- Using an oversize die on the wrong checker. White's remaining checkers are on 4 and 2. A 6 can bear off from 4, the highest occupied point, but not from 2. With a 3 instead, White cannot bear off from 2 while 4 is occupied: move 4 to 1 if it is open. These illustrate individual dice; the other die in the roll must also be used when legal.
These original examples apply the mandatory-move, entry and bearing-off rules in USBGF and Backgammon Galore.
Page 4: keep score together
Before playing, write Player A and Player B's names, the date and your target points. Agree whether you are counting casual wins or playing a points match, and whether to use the cube. The printed scorecard has nine writable rows with the following fields. Copy this structure onto paper if you prefer; enter A or B in the winner column.
| Game | Winner | Result | Cube | Points earned | A running total | B running total |
|---|---|---|---|---|---|---|
| 1 | ||||||
| 2 | ||||||
| 3 | ||||||
| 4 | ||||||
| 5 | ||||||
| 6 | ||||||
| 7 | ||||||
| 8 | ||||||
| 9 |
The game winner adds points; the loser adds zero. Use these result codes for standard scoring:
| Code | Result | Points |
|---|---|---|
| S | Single: the loser has borne off at least one checker | 1 × cube value |
| G | Gammon: the loser has none off, and no checker on the bar or in the winner's home board | 2 × cube value |
| BG | Backgammon: the loser has none off, and a checker on the bar or in the winner's home board | 3 × cube value |
| D | A player declines a double | The cube value before the offer; no gammon or backgammon multiplier |
An undoubled game has cube value 1. A gammon with the cube at 2 earns 4 points. Record the old cube value for a declined double. At the start of each new game the cube resets to 1 and is available to either player.
If you use the cube
Offer a double at the beginning of your own turn, before rolling. Either player may make the first offer. Accepting doubles the game value and gives the accepting player ownership of the cube; only its owner may offer the next redouble. Declining ends the game at the value before the offer, without a gammon or backgammon multiplier. See USBGF's doubling and scoring rules.
Casual play and match play
For a first casual game, you can agree to omit the cube and simply count wins. This is a learning choice, distinct from standard points scoring. In a points match, the first player to reach or exceed the agreed target wins.
Standard match play uses the Crawford rule: after a player first reaches one point short of the target, the next game has no doubling. Doubling returns in subsequent games if the match continues. For example, in a five-point match, a score of 4–2 triggers a cube-free next game. The Jacoby rule, beavers and automatic doubles are not used in match play. USBGF's match-play and Crawford explanations provide further detail.
Keep learning
Use the setup guide to check your board, how to play for your first turns, and the bearing-off guide for the finish. The printable is version 1.0.0. It is a beginner reference, not a tournament regulations manual.