Learn
How to play backgammon: your first complete game
Learn the opening roll, legal moves, doubles, hitting, re-entry, bearing off and scoring with a clear first-game walkthrough.
Backgammon is a race with blocking and hitting: move your 15 checkers into your home board, then remove them, or bear them off. The first player to bear off all 15 wins. Each die is a separate move, and a point held by two or more opposing checkers is unavailable as a landing point.
These are standard backgammon rules. For a first practice game, agree to play without the doubling cube while you learn checker movement. You can add points and the cube once both players can finish a turn confidently. The core rules are documented by the U.S. Backgammon Federation.
1. Set up and agree on direction
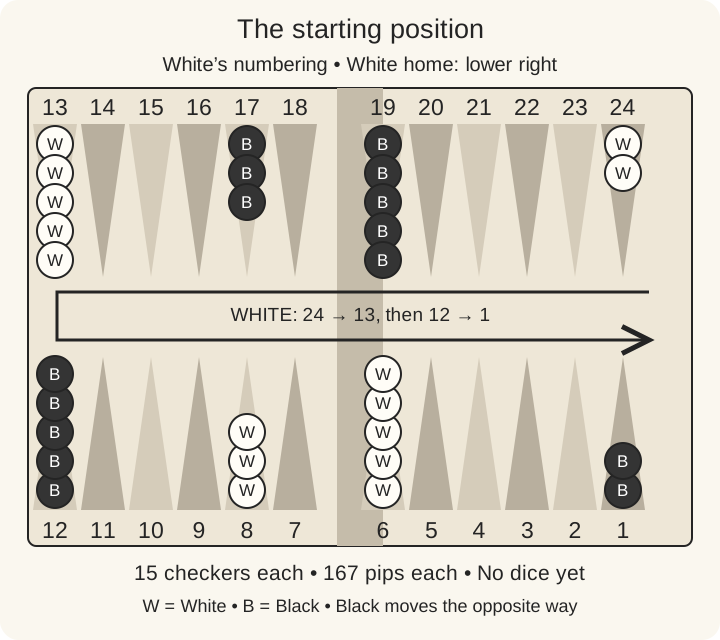
Use a 24-point board, 15 checkers each and ordinary six-sided dice. Put your checkers on your 24-point (2), 13-point (5), 8-point (3) and 6-point (5). The diagram numbers everything from White’s perspective. White moves down from 24 to 1, toward the lower-right home board; Black moves in the opposite direction. See the setup guide for a stack-by-stack check.
2. Decide who starts
Roll one die each. If they match, both players reroll. The higher roller starts using those two different numbers—do not roll a new pair.
Suppose White rolls 3 and Black rolls 1. White plays 3–1. One useful opening is to move a checker from 8 to 5 with the 3 and another from 6 to 5 with the 1. Two White checkers now hold point 5. After that opening turn, Black rolls two dice; players alternate rolling two dice for the rest of the game.
3. Play each die as a separate move
You may land on an empty point, a point occupied by your own checkers or a point with exactly one opponent checker. You cannot land on a point containing two or more opponents. You can pass over blocked points within one die’s move.
With 4–2, you might move one checker four points and another two. Or move the same checker twice. If that checker starts on 13, either 13/9/7 or 13/11/7 is possible only when every landing in that route is open. An open final point does not excuse a blocked intermediate landing.
Use both dice whenever any legal sequence permits it, even if you prefer a move that uses only one. If only one die can be used, use it; if either could be used but the two cannot both be played, use the higher. If no move is possible, your turn ends. You cannot save an unused die for later or pass by choice.
After the opening, doubles mean four moves of the same size. A roll of 2–2 gives four twos, not one move of eight. Use as many of the four as legally possible. The legal-turn guide works through blocked routes and forced choices.
4. Hit a blot, then learn the bar
One checker standing alone is a blot. Landing on an opposing blot sends it to the bar. A hit is a landing, not merely passing over the checker.
When you have a checker on the bar, you must bring it back through the opponent’s home board before moving any checker elsewhere. For White, a 1 enters on 24, a 2 on 23, and so on through a 6 on 19. An entry point with two opposing checkers is blocked. If every entry offered by the dice is blocked, you cannot move that turn.
After your last bar checker enters, use any remaining dice legally. You may move the newly entered checker again. You may also hit with one die and continue with the same checker using the other: standard backgammon allows this, including inside your home board. Backgammon Galore explains hit-and-run and mandatory dice use.
5. Bring everyone home and bear off
For White, all checkers still in play must reach points 1–6 before any can leave the board. An exact die takes a checker from its matching point: a 4 removes one from point 4. An oversized die can remove a checker from your highest occupied point only when no checker remains farther from off. Otherwise, use that die for a legal move inside home if possible.
Example: with checkers on 5 and 2, a 6 may remove the checker on 5. A 4 cannot remove a checker on 2 while one remains on 5; it can move 5/1 instead if point 1 is open. You must still choose a complete turn that uses both dice when possible.
If an opponent hits you while you are bearing off, stop bearing off until the hit checker re-enters and travels home. Already removed checkers stay off. The bearing-off examples cover oversized dice and awkward blocked positions.
6. Finish and record the result
Once someone removes their last checker, the game ends immediately. With normal scoring, the winner receives one game-value unit if the loser has borne off at least one checker; two for a gammon if the loser has borne off none; or three for a backgammon if the loser has borne off none and still has a checker on the bar or in the winner’s home board.
When a cube is in use, multiply that result by its accepted value. A declined double instead awards the value before the offer. Learn single, gammon and backgammon scoring before starting a points match.
For your first game, pause before ending each turn: have you entered from the bar, checked every landing and used all the dice you can? Those three checks prevent more confusion than memorizing an opening chart.