Learn
Backgammon bearing-off rules, with worked examples
Understand exact and oversized dice, higher occupied points, forced dice use and being hit during bearing off, with four original positions.
You can bear off only when all your checkers still in play are in your home board. Use an exact die to remove a checker from its matching point. An oversized die can remove a checker from the highest occupied point, but never skip over one of your checkers farther from off. You still have to use both dice when a legal complete turn allows it.
The examples below show White’s lower-right home board, numbered 6 to 1 from left to right. “Off” means removed from play; “active” includes checkers on the bar. Each example is a separate position, and omitted opponent checkers are outside this cropped home-board view. The USBGF bearing-off rules provide the rule basis.
Exact dice: remove from the matching point
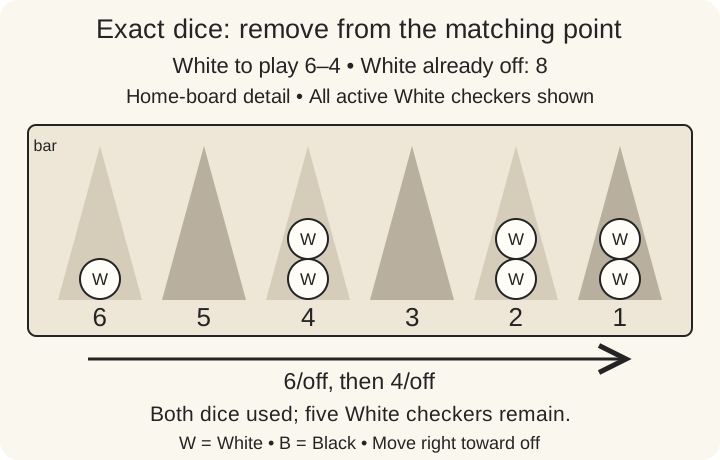
Here 6/off uses the 6 and 4/off uses the 4. Both dice are used and five checkers remain. You do not need to empty point 6 before taking an exact checker from 4: the restriction on higher occupied points applies to oversized removal, not exact removal.
An oversized die uses your farthest remaining checker
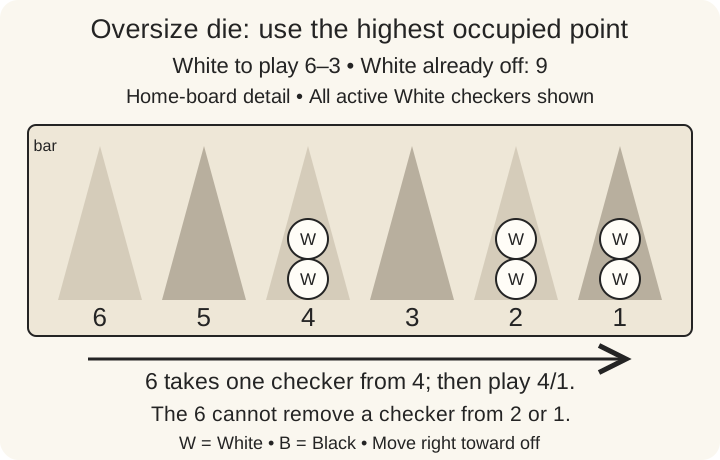
There is no checker on 6 or 5, so a 6 may remove one from 4. It cannot remove a checker from 2 or 1 while 4 remains occupied. Complete this turn by playing the other 4-point checker to 1 with the 3. Both dice are used; the 3 does not take a checker off in this sequence.
Check the highest occupied point again after each move. It can change during the same turn.
An empty exact point does not automatically mean bear off
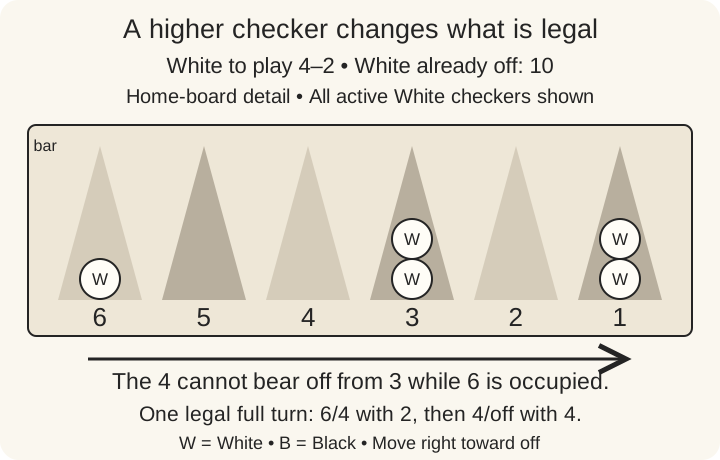
With the position as shown, playing 3/off with the 4 is illegal: your checker on 6 is farther from off. You could play 6/2 with the 4 and then 3/1 with the 2. Another legal choice is 6/4 with the 2, then 4/off with the 4. You are not obliged to remove a checker if an alternative legal complete turn moves inside the board.
This is why “always play the bigger die first” is a bad rule to learn. Either order is allowed, subject to the whole-turn requirements.
Both-dice obligations can override an attractive removal
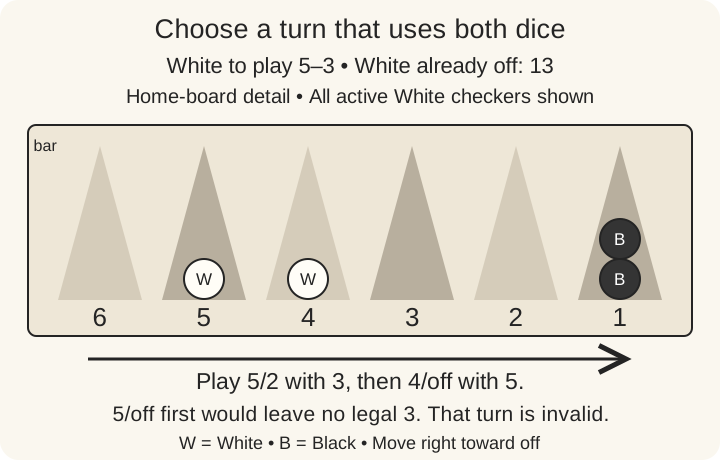
Only two White checkers remain. Removing the 5-point checker first looks tempting, but the checker on 4 cannot then move three spaces: Black blocks point 1. You would have used only one die.
There is a way to use both: play 5/2 with the 3, then 4/off with the 5. After 5/2, point 4 is your highest occupied point, so the oversized 5 legally bears it off. White ends with one checker on 2. Because this sequence uses both dice, the one-die turn is invalid. Backgammon Galore’s rules FAQ confirms that you cannot choose a move solely to avoid using the other die.
If no sequence uses both dice and either can be played alone, you must play the larger. For example, with just one checker on 1 and a roll of 6–2, remove it with the 6. The game ends; there is no remaining checker for the 2.
What happens if you are hit?
Your home board can still contain an opponent’s checkers while you bear off. Leaving a blot may let that opponent hit you on their next turn. A hit checker goes to the bar, so you no longer have all active checkers at home.
Re-enter before moving elsewhere, travel back around the board, and resume bearing off only when everyone active is home again. You can bring the last outside checker home with one die and start bearing off with the remaining die in the same turn, if legal. The checkers already off never return to the board.
Use this order of checks: all active checkers home; exact or properly oversized die; legal landing; maximum dice used. Then compare the final position before ending the turn. Continue with re-entry from the bar or keep the starter kit nearby for a short table reference.