Strategy
Backgammon strategy for beginners: choose a useful move
Learn to make points, develop anchors, judge purposeful risks and change plans when a contact game becomes a pure race.
For your first games, look for moves that make useful points, give your back checkers a route home and leave risks with a purpose. Before choosing, decide whether the position is still a contact game or has become a pure race. The same move can be helpful in one and wasteful in the other.
The advice here is a practical starting checklist, not a claim that one plan wins every position. It assumes standard rules and no special match-score objective. If movement is still unfamiliar, start with the first-game walkthrough.
Make points that do a job
Two of your checkers on one point make it unavailable to the opponent. That can protect a landing place, block a back checker or reduce the opponent’s entry options after a hit. A full six-point prime cannot be crossed while intact because no single die can land beyond all six points. These foundations are explained in Chris Bray’s USBGF beginner guide.
Compare two uses of the opening 3–1. Moving 8/5 and 6/5 creates a new made point inside your home board. Moving one checker 13/10/9 uses the same four pips, but leaves a lone checker and makes no new point. The first plan adds a reusable obstacle; the second mainly changes one checker’s location. Pip distance alone does not capture that difference.
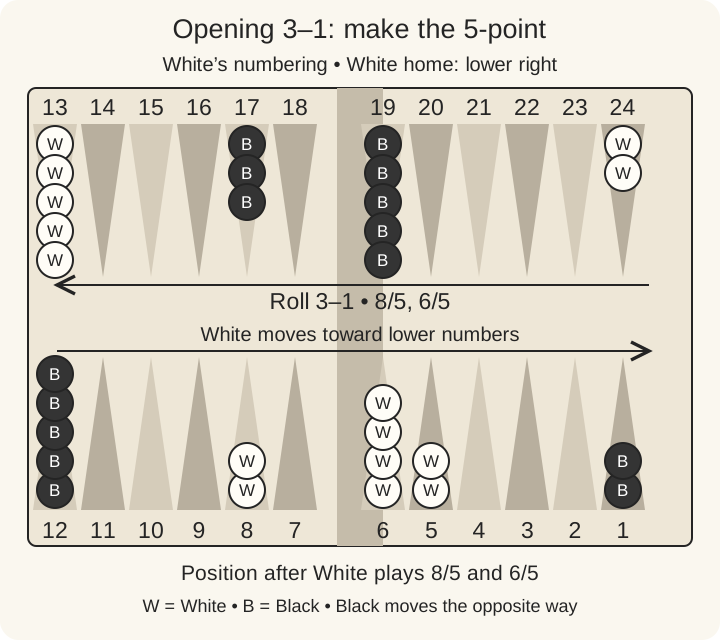
A made point does not have equal value everywhere. A point behind all enemy checkers can no longer block their forward movement. A home-board point may still matter if an opponent can be hit and sent back to enter. Ask what the point will do over the next few rolls.
Give the back checkers a plan
Your two starting checkers on 24 have the longest journey. Leaving them there indefinitely may let the opponent build obstacles in front of them. Splitting them can create chances to advance or make an anchor—a point you hold in the opponent’s home board.
An anchor supplies a safe entry point if you are hit and roll its number, and it can preserve contact with opposing checkers. In our White numbering, an anchor on 20 is in Black’s home; it is not a point in White’s own home. The Backgammon Galore glossary defines the term.
Do not turn “keep an anchor” into an absolute rule. If you are ahead in the race and have a safe escape, running can remove future hitting risk. If you are behind, breaking all contact may give away your remaining chance to hit. Check the rest of the board before releasing both checkers from an anchor.
Distinguish safe play from purposeful risk
A blot is vulnerable, but avoiding every blot is impossible and often unhelpful. A deliberate risk might build a valuable point on the next roll, attack a loose checker or escape before a prime closes. A purposeless risk exposes a checker without improving those prospects.
When comparing two legal turns, ask three concrete questions:
- Where can the opponent land with the next roll?
- If I am hit, how many entry points are open in their home board?
- What useful position do I gain if the checker survives?
For example, leaving a blot against a home board with one made point is a different risk from leaving it against five made points. Being hit in the second position can cost several turns of failed entry. Conversely, hitting an opponent may buy little if your home board gives them easy entry and you dismantle an important point to do it.
Change plans when contact ends
In a pure race, neither side can hit the other again. Blocking the opponent is no longer the goal: use your pips efficiently, bring distant checkers home and avoid a distribution that wastes large dice during bearing off.
Pip count is the total distance to off, counted from each player’s own perspective. Lower means less distance remaining, but checker distribution and whose turn it is also matter. Two positions with the same pip count need not take the same number of rolls to finish. The bearing-off examples show how gaps and higher checkers change the use of a roll.
Review a decision, not just the result
After a game, choose one uncertain turn. Record the position, dice and two moves you considered. Ask what each move was trying to achieve before looking at the next roll. A good plan can be hit; a careless move can escape. One lucky or unlucky reply does not prove the decision was right or wrong.
For a manageable next lesson, learn the point-making patterns in the 15-roll opening chart. Add the doubling cube once you are comfortable finishing legal turns. None of these habits requires a promised winning streak or a claim of expert move grading from the app.