Strategy
Backgammon opening moves: a 15-roll beginner chart
Find a reasonable play for every opening roll, learn move notation and understand alternatives, score assumptions and analysis limits.
There are 15 possible non-double opening rolls in standard backgammon. Each player rolls one die; ties are rerolled, and the higher roller uses the two numbers already on the table. The chart below gives one reasonable beginner play for each roll, with the idea behind it. It is a learning chart, not a universal list of mathematically best moves.
Read the notation first
All numbers are from the player making the opening move: your checkers move toward lower numbers. In our diagrams, that player is White, with home at the lower right. 8/5 means move one checker from 8 to 5. 8/5, 6/5 means move two different checkers to 5. 24/18/13 means one checker uses the 6 and then the 5, landing legally at both stages. An asterisk, as in 9/5*, would mark a hit; none of the chart’s opening plays hits a checker.
The opening procedure and notation are documented in the Backgammon Galore rules FAQ. Recheck the starting stacks before using the chart: it applies only to the opening position, not your reply after the opponent has moved.
One beginner recommendation for every roll
Use these for an ordinary early game with normal gammon/backgammon scoring, without a special match-score plan. They emphasize recognizable point-making and split-and-build patterns. Dice may be used in either order when all landings and full-turn obligations remain legal.
| Roll | Suggested play | What to notice |
|---|---|---|
| 2–1 | 24/23, 13/11 | Split the rear pair and bring a builder down from 13. Both moved checkers remain blots. |
| 3–1 | 8/5, 6/5 | Put two checkers together on your 5-point. |
| 3–2 | 24/21, 13/11 | Advance one back checker and bring another toward your home-board builders. |
| 4–1 | 24/23, 13/9 | Separate the back checkers and place a builder on 9. |
| 4–2 | 8/4, 6/4 | Make your 4-point with one checker from each stack. |
| 4–3 | 24/21, 13/9 | Give a back checker room and develop a builder; neither new point is made yet. |
| 5–1 | 24/23, 13/8 | Split with the 1 and reinforce an existing safe point with the 5. |
| 5–2 | 24/22, 13/8 | Advance a back checker two spaces and reinforce point 8. |
| 5–3 | 8/3, 6/3 | Make your 3-point rather than leave two unrelated blots. |
| 5–4 | 24/20, 13/8 | Reach the opponent’s 5-point with one checker, seeking an advanced anchor later. |
| 6–1 | 13/7, 8/7 | Make your bar-point, the 7-point, next to your existing 6-point. |
| 6–2 | 24/18, 13/11 | Move one back checker into the outer board and bring down a builder. |
| 6–3 | 24/18, 13/10 | Escape one back checker from the home quadrant and develop the 10-point builder. |
| 6–4 | 8/2, 6/2 | Make the 2-point. It blocks entry there, though it commits two checkers deep in home. |
| 6–5 | 24/18/13 | Run one back checker all the way to your occupied 13-point. |
“Split” means separate the starting pair of back checkers; “builder” means a checker positioned to help make another point on a later roll. A single checker on the opponent’s 5-point is a potential anchor, not an anchor yet.
See a point-making play
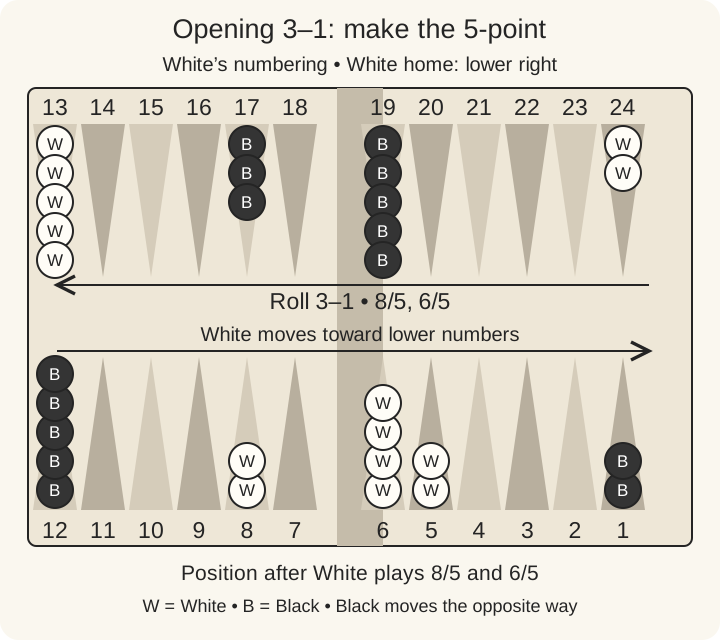
For 3–1, the checker from 8 lands on 5 using the 3, then a checker from 6 joins it using the 1. You still have 15 checkers. Point 5 is now unavailable to Black as an ordinary landing or as an entry after a future hit. The same two-source pattern explains 4–2 and 5–3; 6–1 makes a point just outside home instead.
Alternatives and evidence limits
This chart is an editorial selection of legal beginner plays. We checked it against Tom Keith’s published opening rollouts, which used GNU Backgammon 0.14, 2-ply play and principally 46,656 trials per candidate under cubeless money-play scoring. Those are historical analysis settings, not a fresh engine run for this guide. The source derives special-score results from its cubeless outcomes and notes that score-specific rollouts could differ.
Several rolls deserve alternatives. With 2–1, 13/11, 6/5 slots your 5-point instead of splitting; it risks a hit while aiming to cover a valuable point. With 3–2, 13/11, 13/10 develops two builders. With 4–3, 13/9, 13/10 does the same at different distances. With 5–4, 13/8, 13/9 builds without advancing a back checker. With 6–4, 24/18, 13/9 splits and builds, while 24/18/14 runs. These are genuine choices to study, not mistakes merely because they differ from the chart. Their relative appeal can be close and score-dependent; no modern numerical ranking is claimed here.
At double match point, winning the game is all that matters; at other scores, winning or avoiding a gammon can change priorities. Do not carry a general opening recommendation into every match score as a law.
Learn the reason for a play, then use the beginner position checklist once the board changes. If a move seems blocked, return to legal landings and complete turns before choosing an alternative.