Strategy
Backgammon pip counting: worked examples
Learn to count backgammon pips, including bar checkers and bear-offs. Check three practice positions and understand what a race lead can tell you.
A pip count measures the total distance your checkers still have to travel before they are off the board. Count each checker from its own side: your 1-point is next to your bear-off tray and your 24-point is farthest away. Multiply each point number by the number of your checkers on it, then add the results. A checker on the bar counts as 25 pips; a checker already off counts as zero.
A lower count means less distance remaining. It does not, by itself, mean a better position or a certain win.
Count the starting position: 167 pips
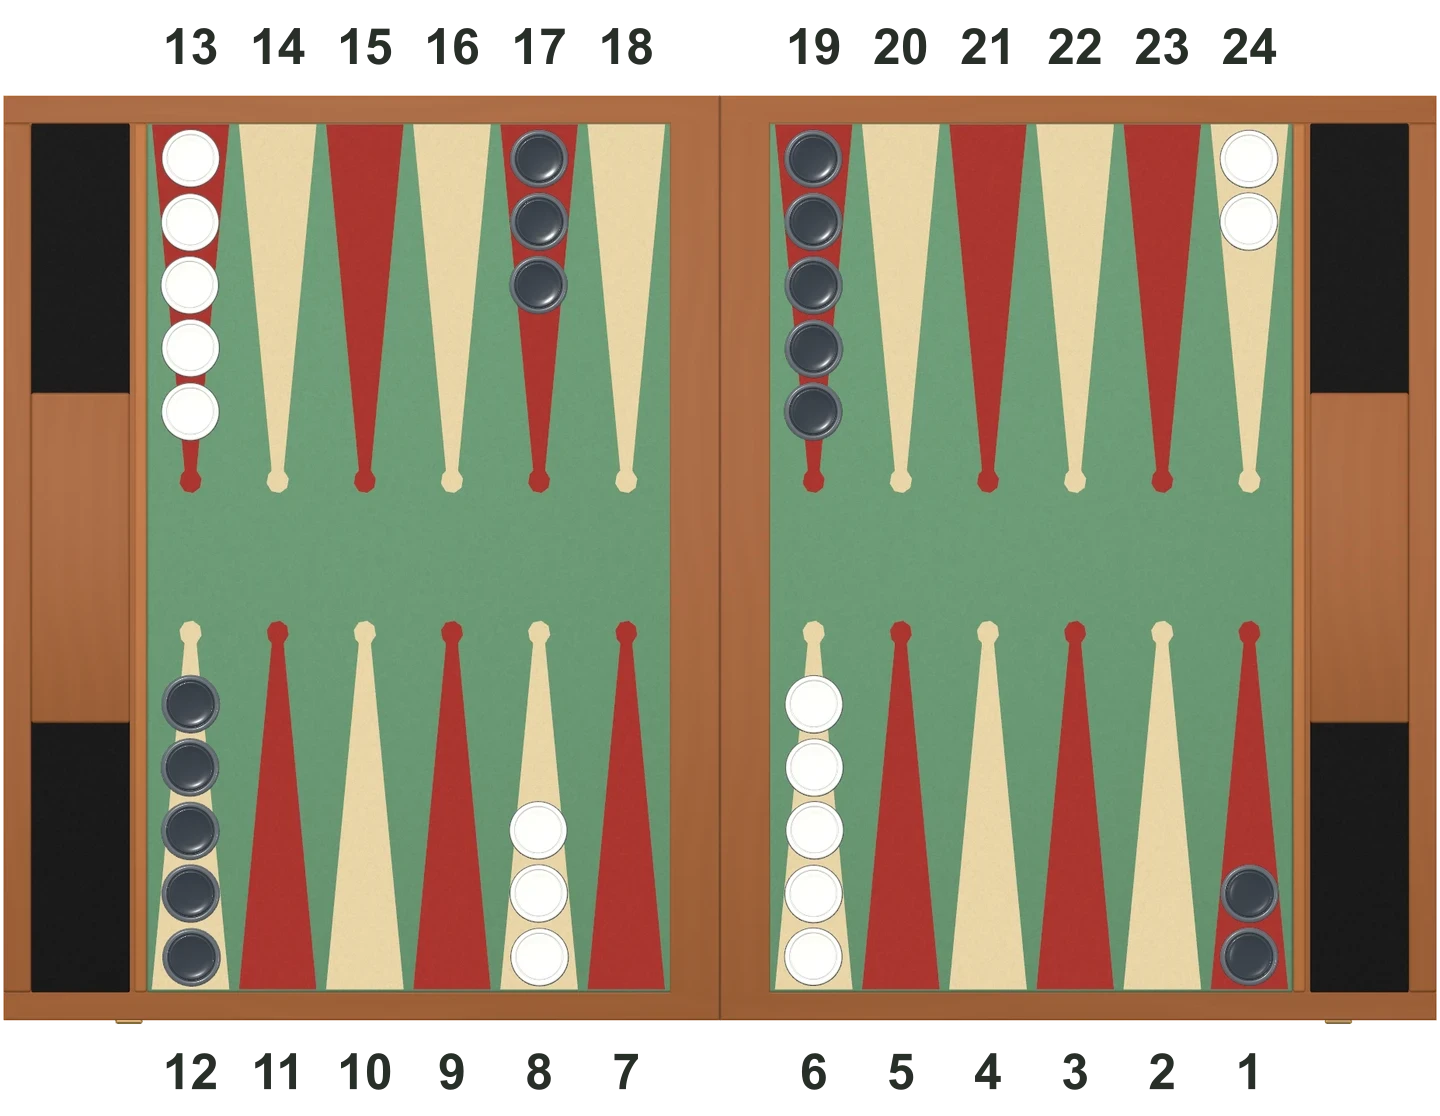
Use White's numbering in this diagram. Only count White's checkers in the calculation below. For Black, reverse the numbering and count Black separately.
| Your point | Your checkers | Pips |
|---|---|---|
| 24 | 2 | 48 |
| 13 | 5 | 65 |
| 8 | 3 | 24 |
| 6 | 5 | 30 |
| Total | 15 | 167 |
Try saying the running total aloud: 48, then 113, then 137, then 167. Both players start with the same count. If yours differs, check the starting setup and your direction of travel before recounting.
A repeatable counting method
- Choose one player's perspective and keep it throughout the count.
- Work from the highest occupied point towards the 1-point.
- Multiply each occupied point by its checker count. Add each subtotal once.
- Add 25 for every checker on the bar. Ignore checkers already off.
- Check that checkers on points, on the bar and off add up to 15.
Do not count the opponent using your numbers. A point that is your 6-point is their 19-point. Mixing the two perspectives can produce plausible-looking totals that are completely wrong.
Three practice counts, with answers
Cover the answer column while you work. Each row describes all 15 checkers for one player; no information about the opponent is needed to calculate this player's raw count.
| Position | Your checkers | Sum | Answer |
|---|---|---|---|
| A: after a 3–1 opening | 2 on 24; 5 on 13; 2 on 8; 4 on 6; 2 on 5 | 48 + 65 + 16 + 24 + 10 | 163 |
| B: partly borne off | 1 on 6; 2 on 4; 2 on 2; 2 on 1; 8 off | 6 + 8 + 4 + 2 | 20 |
| C: one on the bar | 1 on the bar; 5 on 6; 4 on 4; 3 on 2; 2 on 1 | 25 + 30 + 16 + 6 + 2 | 79 |
Position A follows 8/5 and 6/5: the two moves use four pips in total, so 167 becomes 163. See the opening-move examples for the board and move notation.
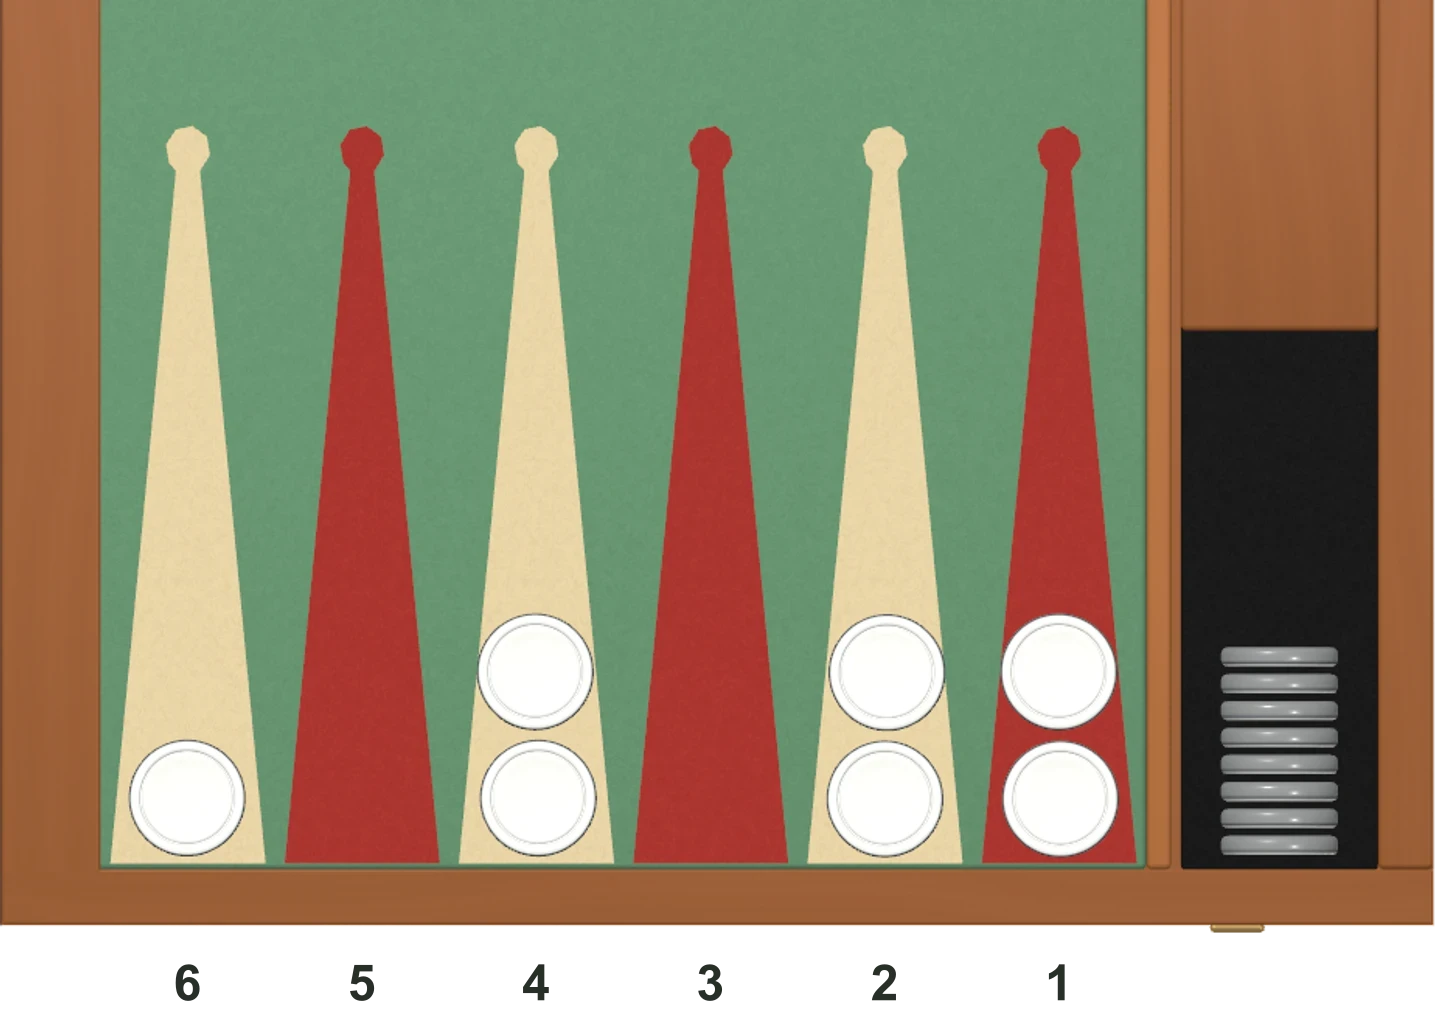
This is position B. There are seven checkers on the board and eight off, making 15. White's count is 20. With a 6–4, removing the checker on 6 and one on 4 leaves a count of 10.
For position C, the bar checker contributes 25 even if it cannot enter on the next roll. Blocked entry changes its chances of moving; it does not change its current distance.
Updating a count after a roll
For ordinary movement, subtract the distance actually moved. If both dice of 6–3 are played normally, your count falls by nine. Four playable 2s reduce it by eight. A die you cannot legally use contributes no movement.
There are two important exceptions to the shortcut of subtracting the dice total:
- Oversized bear-off: removing a checker from your 4-point with a 6 reduces your count by four, not six. The extra two pips are unused distance.
- Getting hit: moving a checker from your 5-point to the bar increases your count from five to 25 for that checker, a rise of 20.
When you hit an opponent, update their count using their point numbers. Your own count still falls by the distance your checker moved. If the arithmetic becomes hard to track after several hits, recount the board instead of carrying an uncertain total forward.
Compare counts without overreading them
If you have 79 pips and your opponent has 86, you lead by seven pips. In a pure race, where neither side can hit or block the other, that is useful information. You still need to know whose turn it is and how the checkers are distributed.
In contact positions, a lower count can coexist with exposed blots, trapped checkers or a weak home board. A well-timed hit can reverse the race immediately. Do not run away from a useful anchor simply because your count is lower.
Near the finish, the distribution matters too. Compare these positions, with all other checkers already off:
| Position | Raw count | Minimum bear-off rolls |
|---|---|---|
| One checker on the 6-point | 6 | At least one; whether it finishes depends on the roll |
| Six checkers on the 1-point | 6 | At least two, because one roll can remove at most four checkers |
Equal raw counts do not mean equal winning chances. The count alone also cannot tell you whether to double or accept a cube. Learn the doubling-cube rules first, then study race decisions separately.
Quick self-check
Does a checker on the bar count as 24 or 25? It counts as 25. Entering with a 1 puts it on your 24-point, reducing its distance by one.
Do borne-off checkers count? They contribute zero pips, but include them when checking that you have accounted for all 15 checkers.
Can I subtract every roll from the starting 167? Only if you track actual legal movement, hits and oversized bear-offs correctly. Counting the current position is more reliable when you lose track.
Use the bearing-off worked examples to practise the difference between the dice total and the distance actually used.