Strategy
8 common backgammon mistakes and how to fix them
Fix common backgammon mistakes in bar entry, dice use, bearing off, hitting and doubling, with worked corrections and a simple review routine.
Beginner backgammon mistakes fall into two groups: illegal moves and legal moves that leave you with a weaker position. Fix legality first, then ask what your move is trying to achieve. The eight examples below give you a specific check to use before finishing a turn.
1. Counting in the wrong direction
The mistake: moving towards whichever tray looks closest, or using your opponent's point numbers halfway through a move.
The correction: identify your home board before the opening roll. Your checkers travel from your 24-point towards your 1-point. Your opponent travels the other way. From your 13-point, a 5 moves a checker to your 8-point, not your 18-point.
Lay out the starting board and follow one checker all the way home. This also makes written moves such as 13/8 easier to read.
2. Moving another checker while one is on the bar
The mistake: treating a checker on the bar as something you can deal with later.
The correction: enter all your bar checkers before moving checkers elsewhere. If the only legal entry uses one die, play that entry first and then consider the other die. If a checker remains on the bar and cannot enter, you cannot spend the remaining die somewhere else.
For example, with one checker on the bar and a 4–2, suppose the opponent holds their 4-point but their 2-point is open. Enter using the 2, onto your 23-point. Then look for a legal 4. The blocked 4-entry does not automatically make the whole turn a pass. See hitting and bar entry for a pictured position.
3. Choosing a move that wastes a playable die
The mistake: selecting a convenient first move that makes the second die impossible, even though another order uses both.
The correction: check the whole roll before moving. When a legal sequence uses both dice, you must use both. If only one number can be used, and either number is individually playable, you must use the larger one.
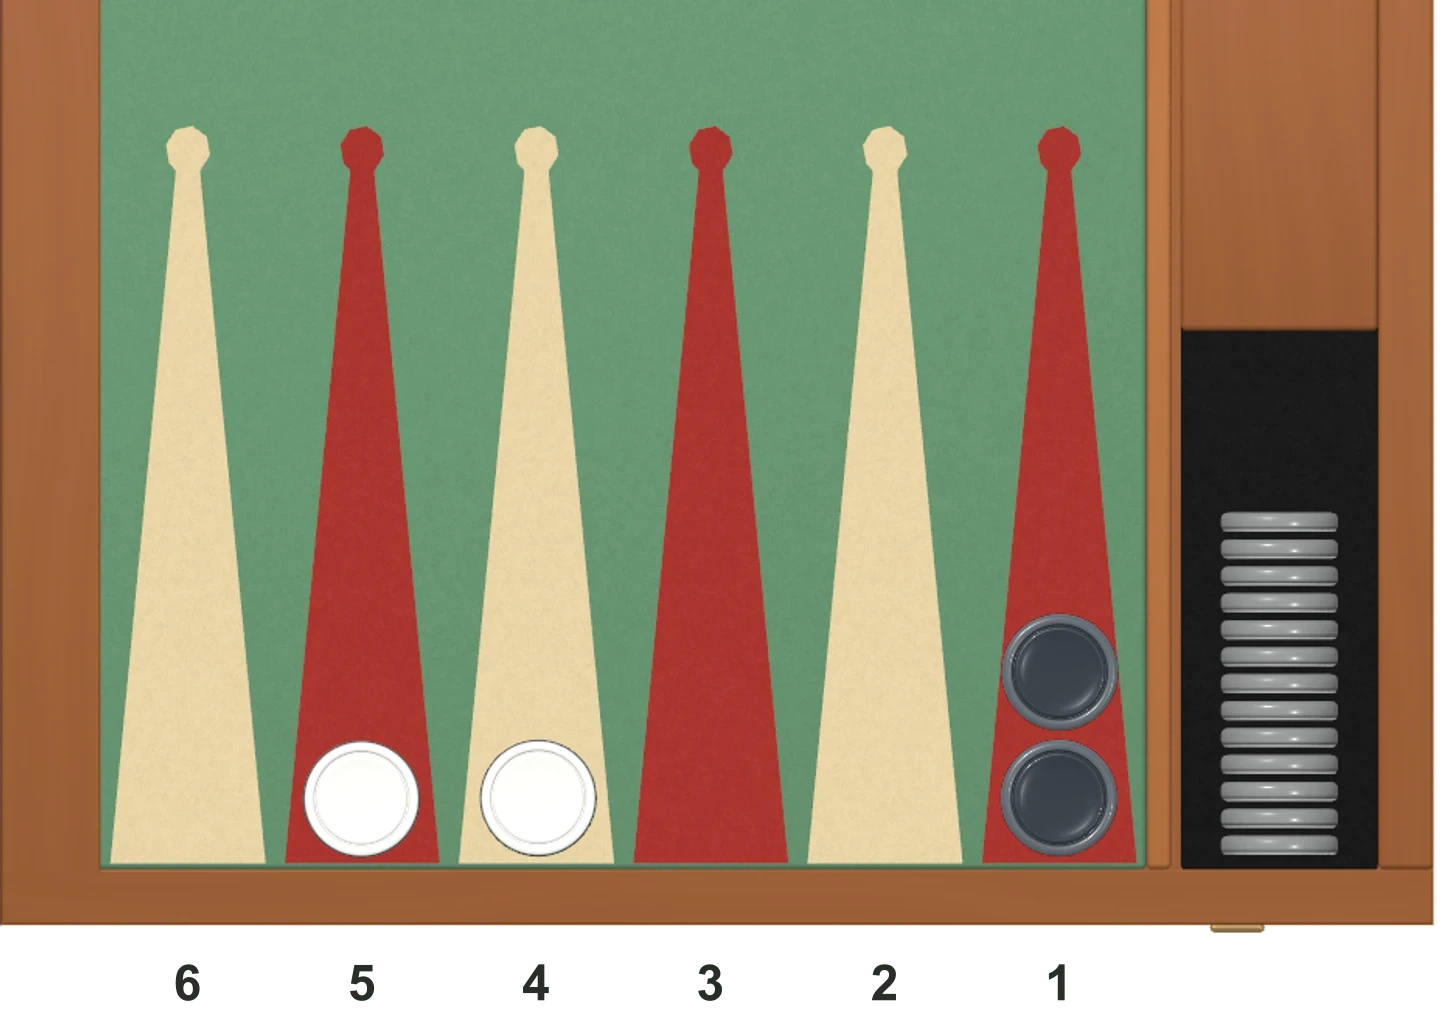
In this position, White rolls 5–3. Starting with 5/off leaves the checker on 4 unable to use the 3 because point 1 is blocked. Instead, play 5/2 using the 3, then 4/off using the 5. Both dice are used and one checker remains on 2. The attractive first move was illegal as part of the complete turn.
The same habit matters with doubles: use as many of the four moves as legally possible. Practise with doubles and legal moves.
4. Bearing off a low checker while a higher one remains
The mistake: thinking any die larger than a checker's point number can remove it.
The correction: an oversized die can remove a checker from your highest occupied point only when no checker remains on a higher point. First check all your remaining checkers are in your home board.
If you have a checker on 6 and two on 3, a 4 cannot remove a checker from 3 while the checker on 6 remains. With 4–2, one possible sequence is 6/4 using the 2, then 4/off using the 4. Read the bearing-off examples to compare exact rolls, oversized rolls and forced dice use.
5. Building a tower instead of useful points
The mistake: repeatedly adding checkers to a point already safely occupied, without considering what the extra checkers can do next.
The correction: compare two legal candidate plays. Does one make a new point, bring a builder within reach of a useful point, or improve the escape of a back checker? Extra checkers on a point can be useful builders, so a stack is not automatically bad. The problem is moving there without a purpose.
As a practice exercise, look at an opening 3–1. Playing 8/5 and 6/5 makes the 5-point with two checkers. Explain what that new point does before comparing it with a play that merely adds another checker to an existing stack. Use the opening guide for the illustrated move.
6. Hitting every blot without checking the reply
The mistake: assuming a hit is always the strongest legal move.
The correction: look at the board you leave behind. Are you breaking an important point? Is the hitting checker exposed? How strong is the opponent's home board if they hit back? A hit may be excellent, but it needs a reason beyond the fact that it is available.
Try this verbal check before a loose hit: “After this move I leave a blot on __; if it is hit, I must enter against __ made home-board points.” Filling those two blanks makes the risk concrete. It does not calculate the best move, but it prevents you from ignoring the return shot.
7. Treating a race lead as a guarantee
The mistake: seeing a lower pip count and abandoning every defensive point.
The correction: decide whether there is still contact. In a pure race, distance matters directly. With contact, a hit or a trapped checker can outweigh a small lead. Even in a race, an awkward bear-off distribution can waste future dice.
If your count is 70 and your opponent's is 76, you lead by six pips. If one of your checkers is then hit from your 5-point onto the bar, your count increases by 20, to 90. The numerical lead was real but fragile. Learn to calculate and interpret the pip count.
8. Deciding to double after seeing your roll
The mistake: rolling a strong number and then trying to offer the cube.
The correction: consider a double before rolling, at a legal opportunity on your own turn. Also check cube ownership and match restrictions. After you accept an ordinary double, you own the cube; your opponent cannot immediately offer the next ordinary redouble.
A useful turn routine is: check the score and cube, consider whether to double, then roll and choose a checker play. In the Crawford game, neither player can double at all. Learn procedure from the doubling-cube guide before studying advanced cube decisions.
A short review after each game
Choose one moment you were unsure about. Write down the roll, the relevant checker locations, the move you chose and one alternative. First check whether both plays were legal. Then state the plan behind each: racing, blocking, attacking or escaping.
A lost game does not prove your move was wrong, and a lucky win does not prove it was right. Reconstructing one decision is more useful than trying to diagnose every unlucky roll. Use the glossary for unfamiliar terms and the beginner strategy guide to build a plan for the next game.